ROS tf 라이브러리 사용하기
tf란?
Introduction to tf
tf는 프레임을 추적할 수 있게 해주는 ros 라이브러리 입니다. tf를 이용해서 두 프레임간의 변환 행렬을 얻거나 서로 다른 프레임의 정보를 Rviz에 보여주기 쉽게 하기도 합니다. 또한 시간이 지나도 과거의 프레임을 추적할 수 있게 해줍니다.
Tutorials
tf를 활용하는 좋은 예는 로봇 좌표계로부터 월드 좌표계로 변환하는 예제입니다.
bagfile에서 rqt로 tf tree를 확인하면 다음과 같은 tree를 확인 할 수 있습니다.
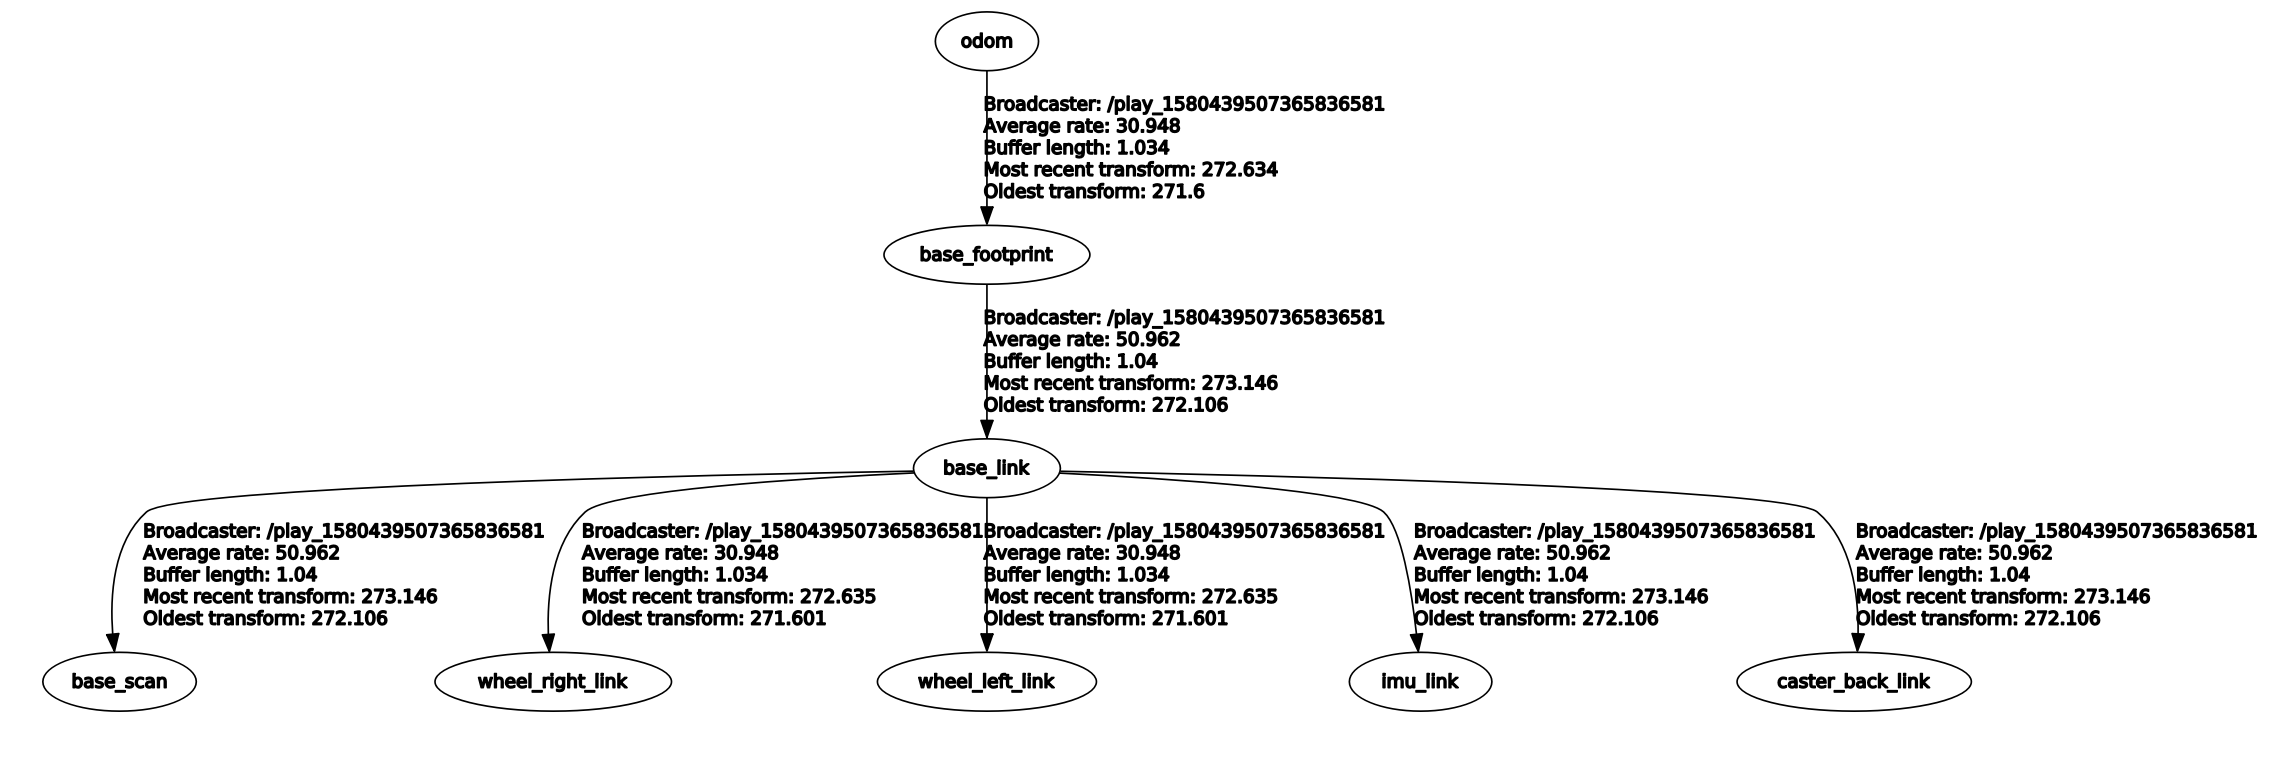
첨부된 bag file에는 frame_id가 /odom인 /odom topic과 frame_id가 /base_scan인 /scan과 /tf가 포함 되어 있습니다. 다시 정리 해보면 odom-base_footprint-base_link-base_scan에서 좌표 변환을 계산하면 되는 예제입니다.
이때 base_footprint-base_link-base_scan로 이어지는 변환은 로봇의 위치와 상관없이 항상 같다고 가정합니다. 이 변환 행렬은 다음과 같습니다.
그리고 로봇의 위치에 따른 전체 변환 행렬은 다음과 같습니다.
그러므로 base_scan에서 odom으로의 좌표변환은 다음과 같이 프로그래밍 할 수 있습니다.
먼저 자신의 workspace로 이동해 다음과 같이 tf_tutorials package를 만들어 줍니다.
$ catkin_create_pkg tf_tutorials roscpp rospy nav_msgs std_msgs sensor_msgs tf tf2 geometry_msgs
그리고 아래와 같이 /scan msg의 callback함수에 점들을 변환한뒤 publish하는 부분을 작성합니다.
void transform_manually(const sensor_msgs::PointCloud *input_cloud,sensor_msgs::PointCloud *output)
{
    //Transform Matrix from global pose
    double pose_x = global_pose.pose.pose.position.x;
    double pose_y = global_pose.pose.pose.position.y;
    double th;
    //quaternion to RPY conversion
    tf::Quaternion q(
        global_pose.pose.pose.orientation.x,
        global_pose.pose.pose.orientation.y,
        global_pose.pose.pose.orientation.z,
        global_pose.pose.pose.orientation.w);
    tf::Matrix3x3 m(q);
    double roll, pitch, yaw;
    m.getRPY(roll, pitch, yaw);
    th = yaw;
    // add static transform
    double T[4][4] = {
        {cos(th), -sin(th), 0, pose_x - 0.032},
        {sin(th), cos(th), 0, pose_y},
        {0, 0, 1, 0.182},
        {0, 0, 0, 1}};
    //transform
    std::cout << th << std::endl;
    for(size_t i = 0;i < input_cloud->points.size();i++)
    {
        geometry_msgs::Point32 point = input_cloud->points.at(i);
        geometry_msgs::Point32 T_point;
        T_point.x = point.x*T[0][0] + point.y*T[0][1] + T[0][3];
        T_point.y = point.x*T[1][0] + point.y*T[1][1] + T[1][3];
        T_point.z = point.x*T[2][0] + point.y*T[2][1] + T[2][3];
        output->points.push_back(T_point);
    }
    //header copy
    output->header.frame_id = "/odom";
    output->header.stamp = ros::Time::now();
    //intensity or etc value
    output->channels = input_cloud->channels;
}


void pointcloud_callback(const sensor_msgs::LaserScan::ConstPtr &msg)
{
    sensor_msgs::PointCloud cloud;
    projector_.projectLaser(*msg, cloud);

    sensor_msgs::PointCloud transform_cloud;
    transform_manually(&cloud,&transform_cloud);
}
실행한 결과는 다음과 같습니다.

ROS의 tf를 사용하면 다음과 같은 코드는 위의 예제와 거의 동일한 동작을 가능하게 합니다.
void transform_tf(const sensor_msgs::PointCloud *input_cloud,sensor_msgs::PointCloud *output)
{
    //get transform from tf listener
    tf::StampedTransform transform;
    tf::TransformListener listener;
    try
    {
        listener.waitForTransform("odom", "base_scan", ros::Time(0), ros::Duration(1.5));
        listener.lookupTransform("odom", "base_scan", ros::Time(0), transform);
    }
    catch (tf::TransformException ex)
    {
        ROS_ERROR("%s", ex.what());
        ros::Duration(1.0).sleep();
    }
    // transform
    for(size_t i = 0;i < input_cloud->points.size();i++)
    {
        geometry_msgs::Point32 point = input_cloud->points.at(i);
        tf::Vector3 point_vec(point.x,point.y,point.z);
        tf::Vector3 new_point = transform*point_vec;
        geometry_msgs::Point32 T_point;
        T_point.x = new_point.getX();
        T_point.y = new_point.getY();
        T_point.z = new_point.getZ();
        output->points.push_back(T_point);
    }
    //header copy
    output->header.frame_id = "/odom";
    output->header.stamp = ros::Time::now();
    //intensity or etc value
    output->channels = input_cloud->channels;
}
실행결과는 다음과 같습니다.

결과는 조금 다르지만 tf방식이 좀더 복잡한 변환에 적합하다는 것을 알 수 있습니다. tf tree만 잘 연결 되어 있다면
listener.lookupTransform("odom", "base_scan", ros::Time(0), transform);
이 한줄로 변환 행렬을 얻을 수 있습니다.
다음 포스트에서는 tf 방식과 직접 변환하는 방식의 차이에 대해 좀더 자세히 알아 보겠습니다.
